Thursday, August 29, 2013

Medicine Cabinet Makeover

I'm completely embarrassed to show you the before picture of the cabinet above the bathroom sink...the medicine cabinet...which ironically contains no medicine. Messy and unorganized! On occasion, I've accidentally grabbed and used someone else's toothbrush. I know, if I've done it, I'm sure my family has done it too -- YUCK! Definitely time for a reorganize!


Before Pictures


Unorganized and messy
Which toothbrush is mine?


After Pictures

Organized youngest (bottom shelf)
to oldest & tallest (top shelf)


The bins hold our toothbrushes, floss,
& toothpaste


This was a quick and simple fix to our messy and unorganized cabinet! I purchased four plastic storage bins (they came in a 2-pack) at Big Lots for $1.09 per set. I spent a total of $2.18 plus tax. Organizing doesn't have to cost a lot of money. 


I found these in the school supply section at the store. They are designed for pencils/pens, but toothbrushes fit perfectly!

They can be cleaned easily by hand or in the dishwasher. 


Bathroom is done, now on to the bedroom...


Tuesday, August 27, 2013

Craigslist Helped us Refurnish Our Daughter's Bedroom

After three months of patient searching on Craigslist, we found all of the pieces to complete our daughter's bedroom transformation! Here is an article that I wrote about our experience, "Refurnishing a Girl's Bedroom Using Craigslist."
Desk, dresser, loft bed

We found a gently used, reasonably priced, solid wood desk, dresser, and loft bed and spent under $300! My daughter's new bedroom furniture has helped to maximize her small amount of space. She has room to play under the loft and tons of storage space.


Limited Bathroom Storage Space? Add a Bookshelf and Baskets for Toiletries!


We have a small bathroom with only one cabinet under the sink and a small linen closet in the hallway which is filled mostly with linens! Toiletries for four people takes quite a bit of storage space. We re-purposed a book shelf that we already owned and added lined wicker baskets to create storage space for the numerous hair products, body lotions, and medicines that we use on a regular basis. They are easily accessible for the entire family. If you have small children, be sure there are no harmful products or medicines within their reach.


Any book shelf will work. Add stylish bins, wicker baskets, or other type of storage containers. Organize your toiletries into categories and fill the bins. The categories that work for us are (beginning with the top shelf):

Shelf 1
Medical supplies such as peroxide, rubbing alcohol, nebulizer machine & supplies 
Medicine

Shelf 3
Hair products
Body lotions, face products, deodorants 

Shelf 5
Toilet paper
Hair dryer, curling iron, hair elastics


Medical supplies
Medicine

Hair products
Body lotions, face products, deodorants


Toilet paper
Hair dryer, curling irons, hair elastics


Thursday, August 22, 2013

Remember Book: A Collection of Your Child's Accomplishments

 Do you have a pile of your child's papers that keep stacking up and cluttering your counter? 


Academic achievements, sports accomplishments, character awards, and certificates of completion represent very important milestones in the life of a child. Usually a document of some sort is given as a remembrance of the accomplishment. These special papers should be kept, not hidden, in the bottom of a box in the back of a closet. A Remember Book is a simple way to organize and store all of these important items.  


I have a Remember Book for each of my children. They love to look through them and so do I! When they graduate from high school this will be a wonderful way to share all of their accomplishments. It was inexpensive and easy to make. You can make a Remember Book for your child too.                                             


Here's what you will need:

                                                                                      
2 or 3 inch ring view binder
Plastic sleeves with 3 holes

8 1/2 x 11 white paper
 8 1/2 x 11 colored paper

Instructions:
1. Purchase binder, plastic sleeves, and paper (you may already have some!)
2. Prepare the cover individualizing for your child & slip into the front view
3. Prepare the school & grade level pages. I centered each one on the page - see the             Second Grade example above. 
        
    Preschool
    name of specific preschool here 

Elementary
name of specific elementary school here

    then a page for First Grade, Second Grade, etc.

Middle School
name of specific middle school here

then a page for 6th, 7th, 8th 

High School
name of specific high school here

then a page for Freshman, Sophomore, Junior, Senior

4. Add the plastic sleeves into the book and slip in each of the school & grade level pages. As events happen throughout the school year, place the items directly into the book. I put the documents, etc. in back-to-back so two items fit per sleeve. 

Here are some examples of items that you can include.

academic achievement

reading certificate
sports award

school concert program
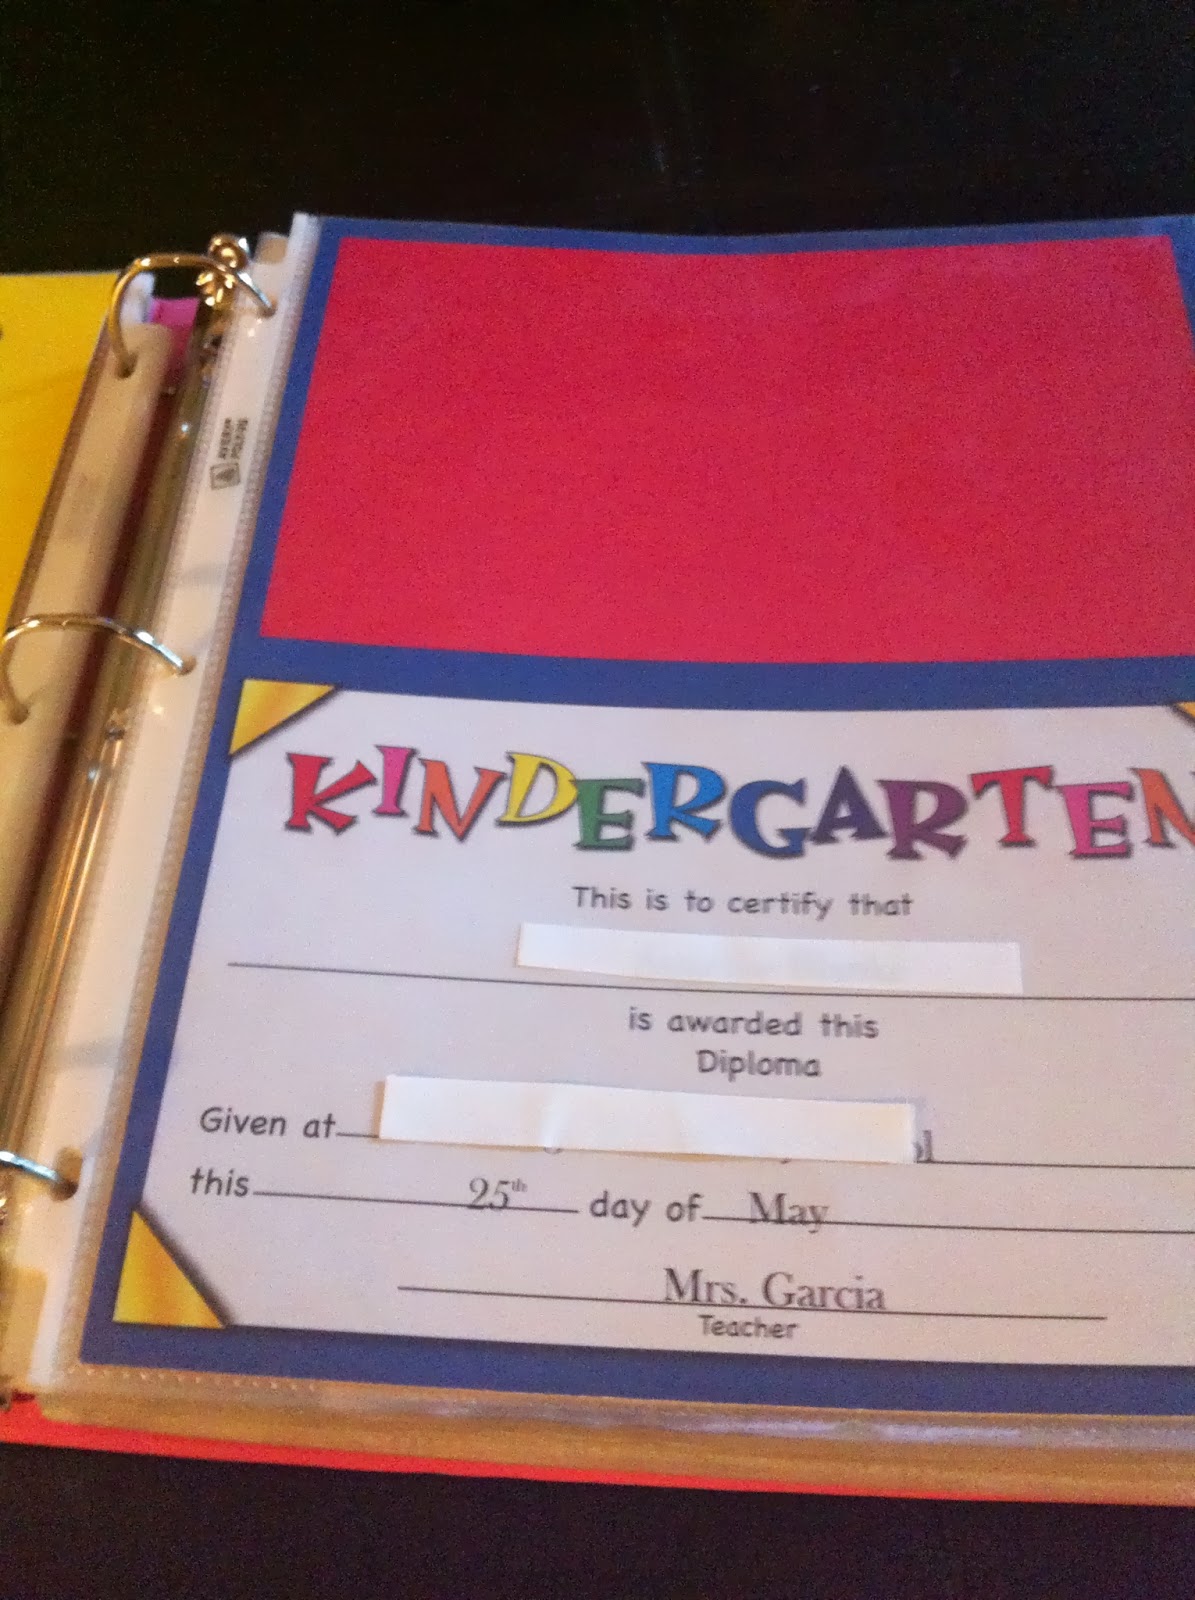
graduation diploma
cub scout memorabilia 


Prepare the entire Remember Book all at once. Then it's ready to go! My oldest's book is getting rather full so I may get a second book for high school and just move the high school pages to book two.

So many great memories and accomplishments...all in one place that is organized and easy to show off!
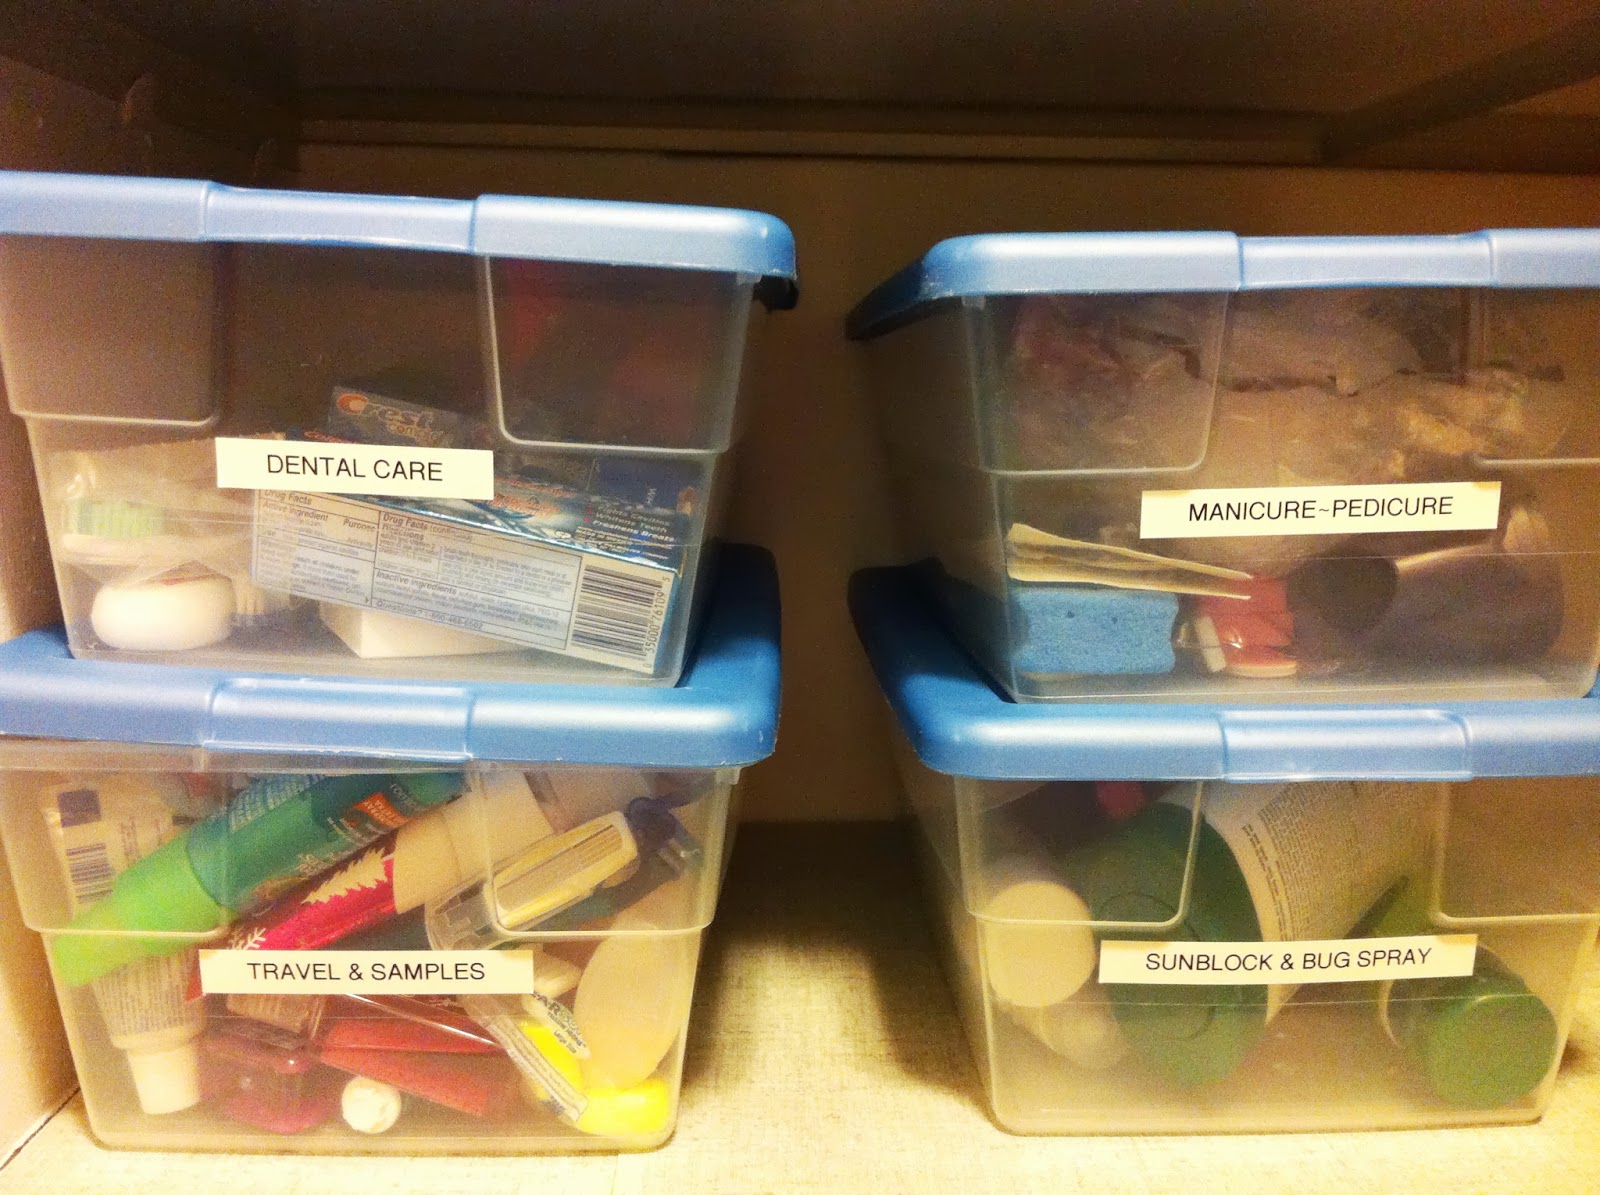

Tuesday, August 20, 2013

Wall Shelves Give the Kids Tons of Bedroom Storage Space

We recently spent time remodeling our daughter's bedroom, but the shelving we installed was an idea taken from our 13 year old son's room. He's had these shelves for quite a while and filled them with no problem! The shelves are about as neat as they're ever going to be, so I thought I'd show you.  


These three shelves provide space for books, memorabilia, gadgets, a printer, and the eight bins provide places for most of it to hide. We removed a bookshelf in his bedroom, providing more floor space for his new and improved desk. 


Our daughter's room has four shelves. Let's just say that she has a lot more "treasures" that need a home. 


We (my husband) purchased the shelves and brackets at Lowe's Home Improvement store. 


Here are instructions for installing the shelves.

What you will need:
shelves
4 brackets per shelf - more or less depending on the amount of support you need
screws
stud finder
pencil
drill
level
white paint/brush - if you use white brackets and black screws - that's what we used!

Step 1: Find someone who is handy if you are not.
Step 2: Decide how far from the floor you want to begin and how far apart you want the shelves to be.
Step 3: Find the studs in the wall and mark them, then mark the height of each shelf.
Step 4: Install the brackets. Place the brackets where they go and mark them. Drill holes and then install the screws. It is very important to lay the shelf on the first installed bracket to make sure it is level before installing all of them. This requires two people.
Step 5: Lay the shelves on the brackets and attach with screws.
Step 6: Paint the screws if needed.

Add canvas bins, baskets, or other storage containers to create great storage in your child's bedroom. 


Saturday, August 17, 2013

Stylish and Functional Organizing Bins


My 8 year old daughter is a professional collector of just about everything she touches! She cannot seem to part with anything...everything is special in her eyes. I really do love that about her; it's just that it was all creating a fire hazard in her 10 x 10 bedroom! 

Notes from teachers, notes from friends, notes that I put in her lunch box. Lip gloss, finger nail polish, body sprays, body lotions, makeup. Jewelry, both real and plastic. Hair bows, ties, elastics, headbands. Gadgets, bouncy balls, sunglasses, flashlights, mini figurines, toys. Crafts she's made, crafts she hasn't finished, parts of crafts she can reuse, craft supplies. Recyclable materials to make (you guessed it) more CRAFTS! Crayons, markers, colored pencils, erasers, pencil sharpeners, notebooks, paper, yarn, material scraps, beads, buttons, and clay (Oh wait, I convinced her to throw that out since it was hard as a rock. She complied.) Get the picture?

So much was crammed into her room and something had to be done! We basically reorganized her entire bedroom. It took us the entire summer. I'll post about that huge undertaking later. I spent some time in there by myself (Shhh...don't tell her!) purging miscellaneous items before inviting her to help.   

We needed a space for all of her "little treasures" that would add to the room decor and be functional at the same time. So along with 3 bins she already had, we purchased 6 more bins from Five Below totaling $15, added homemade tags with pretty ribbons, and so far she has kept herself organized!


I made these tags using items that I already had in my craft area: scrapbook paper, card stock, glue stick, variety of ribbons, jewels, black Sharpie, scissors, glue gun.

I had two different sized tags which I used as templates to cut out all of the tags, attached them together with a glue stick to create a layered look, wrote the label with a Sharpie, used a glue gun to attach the jewel, and tied them onto the container with a ribbon.


 The labels we made were:
~hair
~makeup
~money
~jewelry
~electronics/flashlights
~trinkets
~toys/dolls
~keepsakes
~and gerbils (supplies for the gerbils;)

I love projects that we can do together! 

She chose the colors and patterns of paper and I cut the tags and glued them together.

She chose the color of jewel and where to place it and I used the glue gun. 

She chose the ribbon for each tag and I attached them.


I am so pleased with the completed project that sometimes when I'm passing her room, I open the door, take a quick peek, and smile!

Friday, August 16, 2013

Treasured Works of Art


This impressionist painting hangs in my hallway
(I mounted on white construction paper to give it some contrast)

If your counter, desk or kitchen table is piled high with school papers and artwork then this idea is for you! 

Beginning in preschool our little ones bring home finger paintings, drawings, clay sculptures, and self-portraits. This continues throughout elementary school, although I admit more academic papers and less pieces of art come home. They pile up, you throw them in a storage tub, never to be seen again.


My very own van Gogh

Colorful self-portrait
I love to hang my children's artwork on the walls! It's a simple, inexpensive, quick project to complete. You can decorate your home while enjoying their treasured works of art!                       Here's how you do it...

DIY: Hanging Artwork

You will need:
1. frame
2. piece of art
3. colored card stock or construction paper to mat
4. scissors to trim


STEP 1: Purchase a frame that is the same size as the art or larger if you are going to mat it onto white or colored backing. 
 STEP 2: Select the art that you would like to display. Trim if needed. Mat it onto white or colored paper to create a contrast for framing. I chose to simply frame this beautiful cardinal.
 STEP 3: Remove the backing of the frame and place the artwork inside.


STEP 4: Viola! Beautifully framed to hang in your home.


Label Maker: A favorite organization tool!


My Brother P-touch Label Maker is one of my favorite ways to stay organized! I use it to label files, storage bins & tubs, school supplies, and kid stuff. It helps to keep my desk, closets, attic, garage, basement, bedrooms, teaching supplies, and more in order. 


Label makers are easy to use. Be sure to keep the user's guide close for a quick & easy reference. 


Label Maker Storage:
~small canvas tote - can be purchased at Michaels, Hobby Lobby, or Oriental Trading
~label maker
~power cord
~batteries - for on-the-go labeling
~extra cartridges
~user's guide
~scissors - for trimming labels
*Place everything inside the canvas tote and you're ready to label, label, label!


You can purchase one on Amazon, or a local retailer. The basic models range in price from $16-$30. I received mine as a Christmas gift from my husband...yes it was on my list! You know you love to organize when you frequently receive storage containers, Sharpies, file boxes, etc. for gifts!

Thursday, August 15, 2013

I'm basically organized...

I've thought about doing a blog for quite a while. As I pondered which direction to go...sharing my teaching ideas, my experiences raising two very different children, scrapbooking all of our memories, how to get quick and healthy meals on the table, how to keep up with the house while working...I realized that the key to all of this was organization!

So, I will endeavor to share my ideas about how I strive to be organized. I definitely haven't arrived! I'm an organizational "work in progress." When I think about my family, home, work, life, I'm basically organized. I'd like to help you get Basically Organized too!